

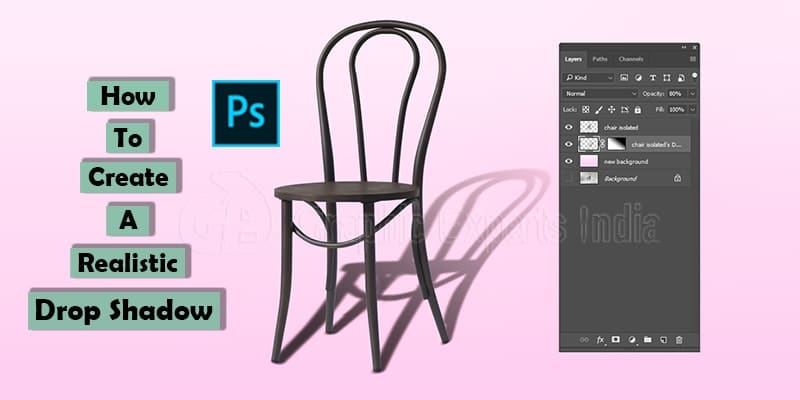
How To Create A Drop Shadow In Photoshop Cs6
Adding realistic shadows around objects makes photos look reliable & professional. Do you know how to give your photographs the true settings? Or do you know what is the best way to get exact lighting to get the shadows you need? Here we will guide you to add a drop shadow in photoshop step-by-step.
Well, with the help of Photoshop technology, you can successfully do it without using any hardware and lighting equipment.
In Photoshop with expertise & patience, you can get the true settings & exact lighting that can give your product photographs a professional look. The entire procedures need skill, time, and understanding of how shadows work.
Please stay with us until the end of this article to know the step-by-step process on how to add a realistic drop shadow.
We will use Adobe Photoshop CS6 but you can easily do it in Photoshop CC. However, you can use one of that software to follow along.
Table of Content (What we will cover):
- Photoshop shadow effect under object or person
- Photoshop shadow effect: an overview of drop shadow
- Best drop shadow settings Photoshop
- The difference: Drop shadow Vs cast shadow
- Adding a realistic shadow in Photoshop Tutorial
- Use a variety of Shadows.
- Shadows in e-commerce: When would you use?
Now, let's start to explain all of them-
Creating Photoshop Shadow Effect Under Object or Person
When it comes to inserting a person or objects into another photograph with Photoshop, it is significant to add a drop shadow to that person or object to make objects believable & realistic. But let's introduce with drop shadow first.
So what is drop shadow?
Well, as the name suggests drop shadow is a Photoshop tool, that when used to a photograph can give it a whole professional look. It is the process of introducing shadow to the pictures that do not have.
Drop shadow technique is favored to develop the shadow effect of the product that features an inaccurate or faint shadow effect. Also, it is highly applicable while the background requires to be transformed to keep the quality of the shadow.
Embracing this modern technology assists to achieve the best work for the customer. It is one of the ways to make the photographs look more attractive to their professional consumers.
In a word, it a creative solution to bring a new appeal to the photo when used in the right position & with the right graphic designer.
Photoshop shadow Effect: an Overview of Drop Shadow
The image drop shadow is the ideal solution when it comes to digital photos. This technique can be applied to add to visual magnificence for natural scenes. The primary involvement is with a product photo.
In order to accomplish the drop shadow, a different layer is made & the photo is high above its bottom layer, then the resolution of the photo is grown up to 72 pixels per inch, and a new photo file is made.
The drop shadow effect is meant in the photograph to make the shadow. It is hard to select the right alignment of the shadow. It is usually left to right alignment id chosen for the images to look professional and realistic.
When it is easy to make the drop shadow effect for larger things, it is hard to make the same for the fine items such as hairs, etc. But the problematic job lies in the details. Nevertheless, with plenty of expert services available, one can depend on them for the chosen services.
The quality of the drop shadow effect relies on how the shadow is combined with the object. A real drop shadow (DS) effect must make sure that the shadow must not appear isolated to the object.
The drop shadow (DS) technique has transformed the way that the photos of inanimate objects appear. Already it has proven that performed with accuracy it can provide a magical appeal to the photograph.
Pros of drop shadow
- Realistic photograph: You can give your photo a more realistic look by adding the Drop shadow.
- Enhance professionalism: It is significant why your photo is more professional than the others in the competition.
- Improve quality: It is the most proven way to improve the quality of your product photograph.
Cons of drop shadow
- Drop shadows are ugly and not refreshing anymore
- It makes your design feel obsolete
- Drop shadows give photocopying problems
Best drop shadow settings in Photoshop:
An object may contain two types of shadow, one of this is "cast shadow," and another one is "form shadow." Here, before Digg in deep let's learn about those settings.
Now you may ask a question, what is a cast shadow, and what is a form shadow?
1. Cast shadow:
The term cast shadow is such a reflection which looks on the floor or different thing typically around the main objective.
2. Form shadow:
The term form shadow is such a reflection on an object that is opposite of the light source.
However, either the cast shadows or the form shadows can be determined by the following parameters.
- The direction of the light.
- The distance of the light from the object.
- The total number of light sources (present on the spot).
For understanding a shadows total works procedure, you have to know how shadows work. Cast shadows are blurrier and lighter because they get more from the object.
The difference: drop shadow Vs the cast shadow:
Adding a realistic shadow is a worthwhile process. On the other hand, adding a drop shadow is a bit easier than the realistic shadow to an object.
A drop shadow is a rough presentation of a shadow containing the same size and dimension of the object.
So adjusting your image into a three-dimensional cast shadow, it is essential then to follow the above-described procedure so that your shadows always look very realistic and professional too.
Are you looking for a quick way that can help your e-commerce product jump off the page and into the shopping cart?Well, if yes, then you are here at the right place. Here you will get the knowledge about shadows in your photographs for e-commerce business that can increase your sales.
The difference: drop shadow Vs the cast shadow:
Adding a realistic shadow is a worthwhile process. On the other hand, adding a drop shadow is a bit easier than the realistic shadow to an object.
A drop shadow is a rough presentation of a shadow containing the same size and dimension of the object.
So adjusting your image into a three-dimensional cast shadow, it is essential then to follow the above-described procedure so that your shadows always look very realistic and professional too.
Are you looking for a quick way that can help your e-commerce product jump off the page and into the shopping cart? Well, if yes, then you are here at the right place. Here you will get the knowledge about shadows in your photographs for e-commerce business that can increase your sales.
How to Add a Drop Shadow Photoshop [Tutorial]:
In this tutorial, I will try to explain a concise process of creation of a realistic shadow in Photoshop by capturing the following things-
- The drop shadow layer style-It defines how to shadow will blend with the background pixels.
- Transform tools- It allows to rotate, resize, reflect, and distort the object.
- The gradient tool- Use to draw all gradients. It can bring any radial, angular reflected or diamond gradient into the shadow of your object.
- BlurTools -Critically needs to paint a blur effect to your shadow. A paint brush is present in this tool by which you can draw the blurriness of the image or the shadow.
- Layer masks -It is a fundamental tool in shadow manipulation. It selectively modifies the transparency of the layer.
- AlphaChannel -Use to determine the transparency setting for a particular area or colors.
Adding a realistic DROP shadow in Photoshop
- Separate your object from the background
- Add a new background behind your isolated object
- Select your cast shadow color
- Add a drop shadow
- Add a layer from your drop shadow
- Distort the drop shadow
- Add an alpha channel
- Add a gradient within your alpha channel
- Blur selection
- Add a layer mask
- Think about light origin & clean up shadows
Now let's discuss the main procedure by the following steps.
Step-1: Separate of your target object from the background
- Select your photo (which you want to add the shadow).
- Open your layer palettes (go for a new file from where you were and then go for window and create the saying layer)
- Cut off your desired object from the main photo.
- Fix the picture on a new white layer.
- Rename your original file (such as isolated one or background removed one etc.) to reduce confusion with different layers because you make your shadows.
Visit this site: What would be the best way to remove an image background by using "MAGIC WAND TOOL".
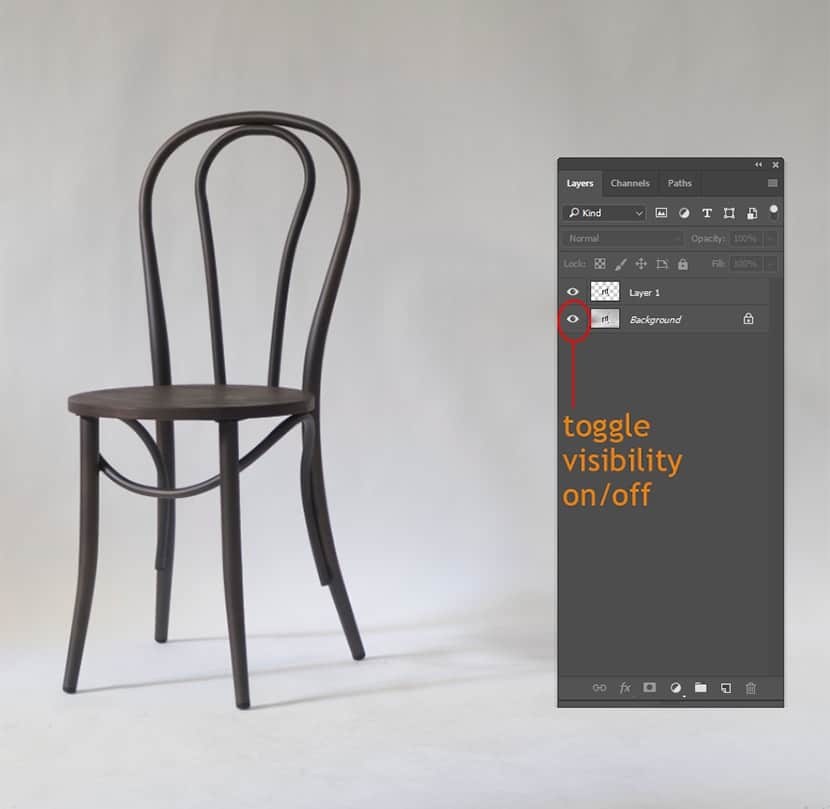
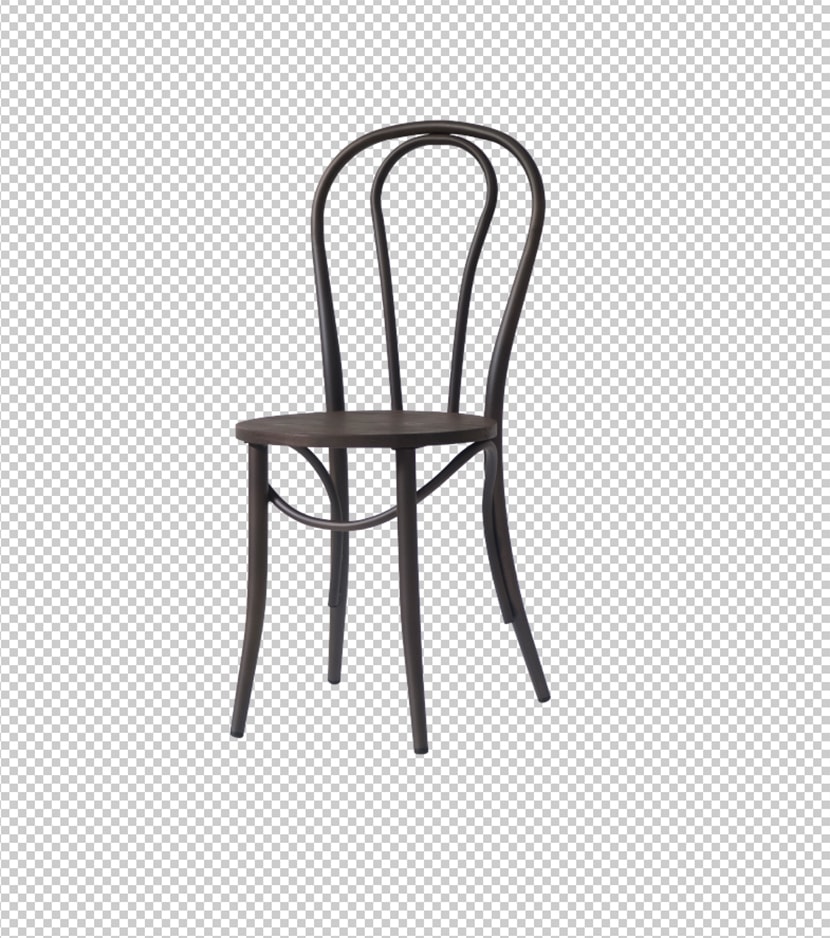
To make the background invisible click on the eye icon next to the background layer.
At this stage, your object is present with only a transparent background.
Step -2: Add a unique background behind your free object
- Choose your hidden background layer (in your layers palette).
- Go to Layer>New layer, or you can type shift+ control + N to add a new layer
- This layer (newly created) now will perform as your unique background.
- Fill the new layer with a color (by clicking to Edit>Fill)
- Select a custom brightness from the DropDown Menu if required to add a custom color.
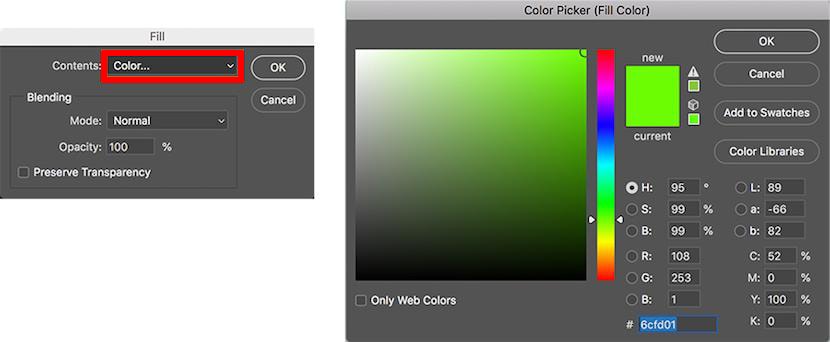
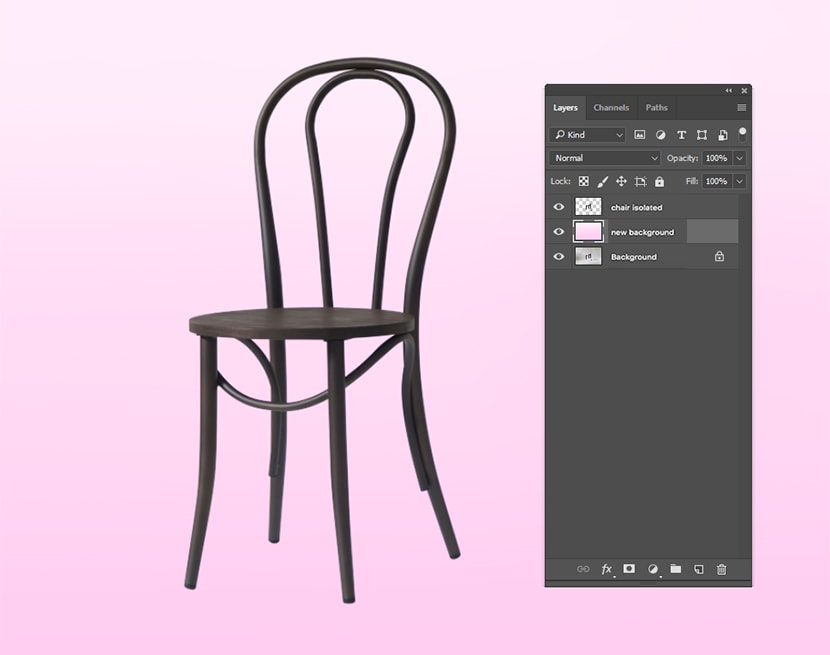
Note: Here, the background was added by covering different grades above the fill hue (color or shade).
Step -3: Resolution of your cast shadows color
- Shadows may appear in various colors. Select the form shadow and fix the color of your cast shadow.
- Then in your object, you need to consider the form shadow.
- Select the form shadow (Use the Eyedropper Tool)
After the selection of the form shadow, it will appear as your foreground color.
- Click on the new foreground twice to get the foreground color box.
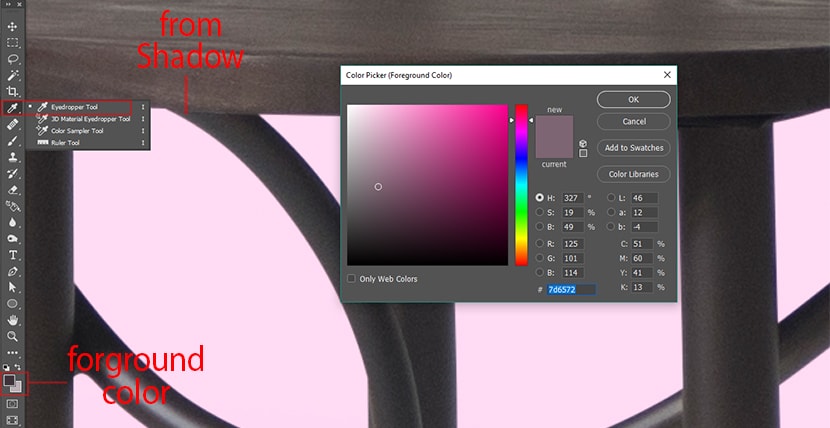
- Adjust the brightness (i.e., darker, or saturate by moving the color field).
- If done, click ok.
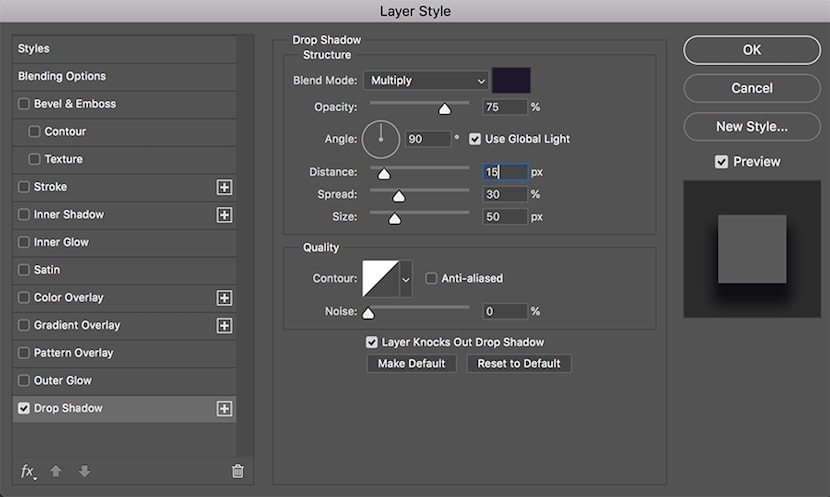
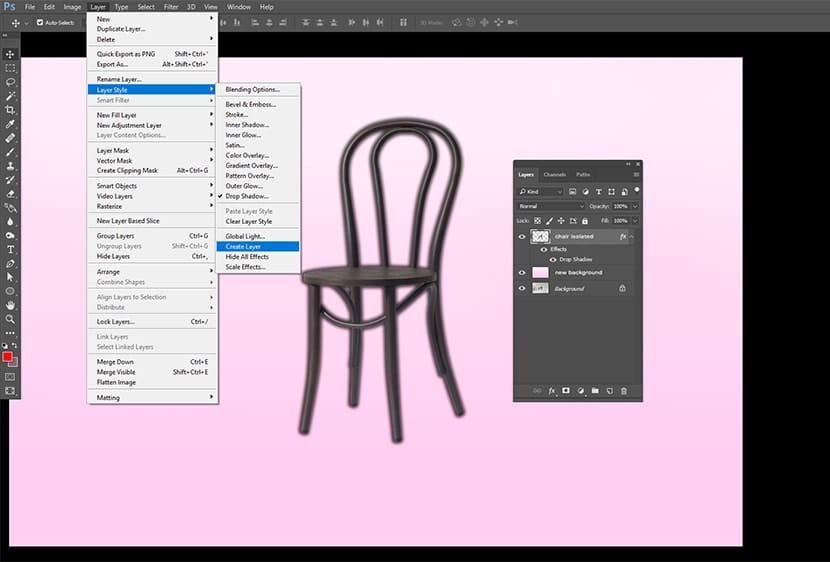
Step-4: Adding a Photoshop drop shadow
- Select the different object layer
- Click on the "fx" option (End of your layer palette)
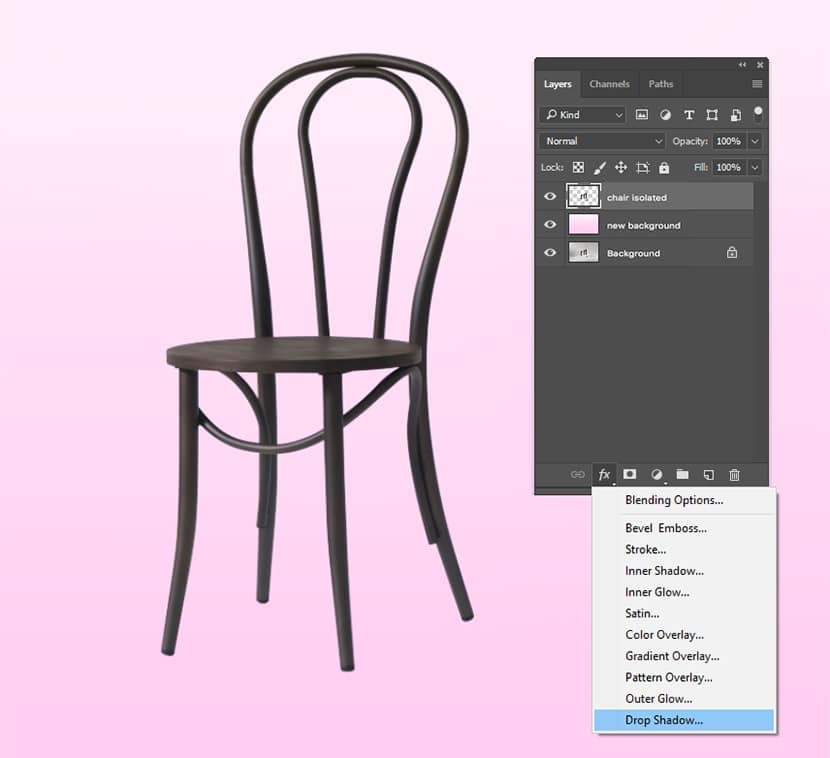
- Then, choose the drop shadow on the dialogue box,
- Set the shadow color to the foreground color (with the help of the Drop shadow dialog box),
- The distance, blurriness, spread & size levels are not that significant today because you can adjust all that later. But in the screenshot below you can apply the values as a beginning point.
- Now click ok (When you feel gratified with your Drop shadow creation).
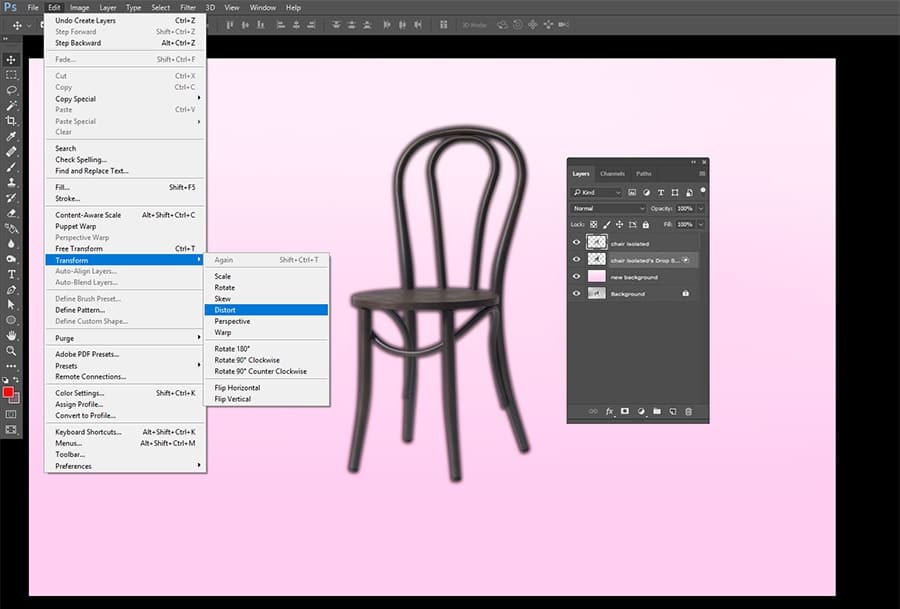
Step-5: Add a layer from your drop shadow
- Go to Layer>Layer genre >Add Layer (if you want to Isolate your drop shadow from its layer)
- Thus you can change the shadow of the object
Note: You may find a warning dialogue box when it comes to adding a layer. If you find a sign like that please click on the "OK" option.
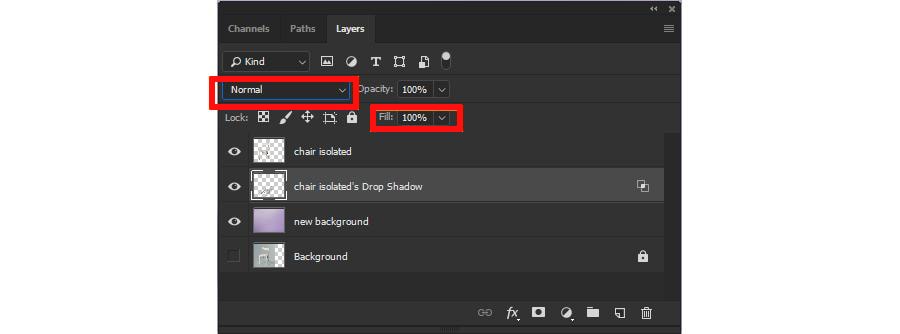
Step -6: Adjusting Realistic drop shadow Color
- Choose the newly added drop shadow layer (In your layers palette)
- Go for Edit>Change>color to draw your drop shadows underneath the floor.
The creative knowledge comes in available here; think about the form shadows are on your image to decide which way the shadow should fall innately and consider the disappearance point of your object to decide how far you need to distort or pervert the shadow.
If needed, you can choose the particular parts of the shadow & change them autonomously to make sure the shadow adds all sections of the object that reach the floor.
You can fix the "adjusting mode" of your shadow layer to "Normal". This will also help your shadow layer to get the "Fill" to a hundred percent (100%).
- Select the area of your shadow you need to change.
- Apply the "Rectangular Marquee software"
- Now Edit, change and Distort/ pervert to modify the particular section of the shadow.
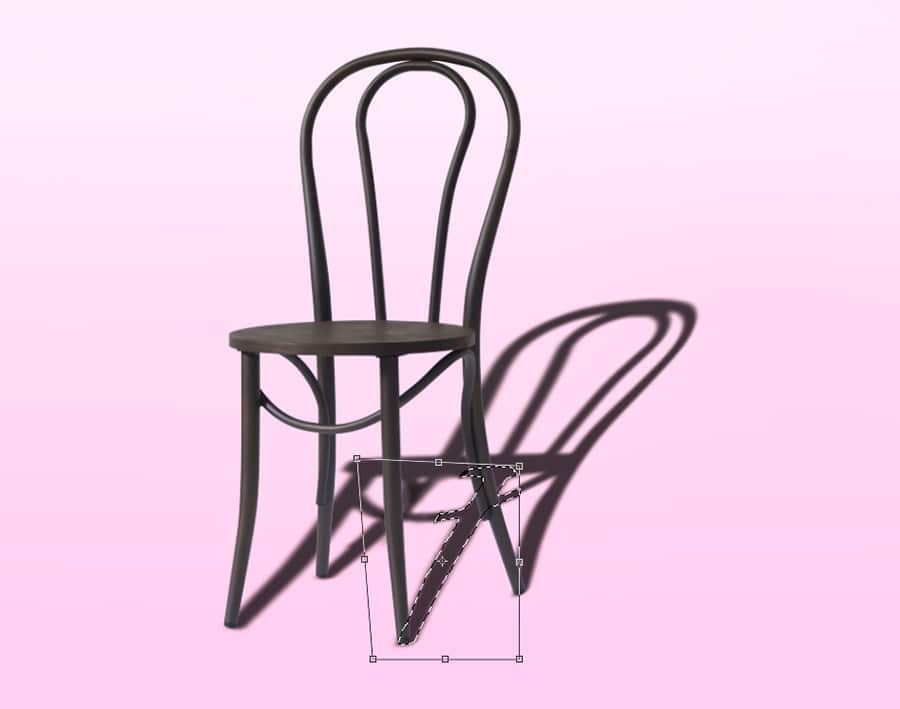
- Use the transformation & apply your Eraser & Paintbrush to solve any sides of your shadows once you satisfy with your transformation.
- Alter the layer blend option of the existing shadow layer back to increase
- Also, lower the "Fill" up to seventy-five percent (75%).
Step-7: Add an alpha-channel
Now the shadow is looking professional & practical. However, you should keep in mind that the shadow becomes blurrier & lighter. So the question is that how can you deal with that situation?
Well, nowadays alpha channel is the best way to deal with the sections of the shadow that requires lightening and blurring. Now follow the instructions below carefully:
- Go to Window>Channels to add an alpha channel
- Open the "Channel Palette"
- To choose a new channel click on the palette table.
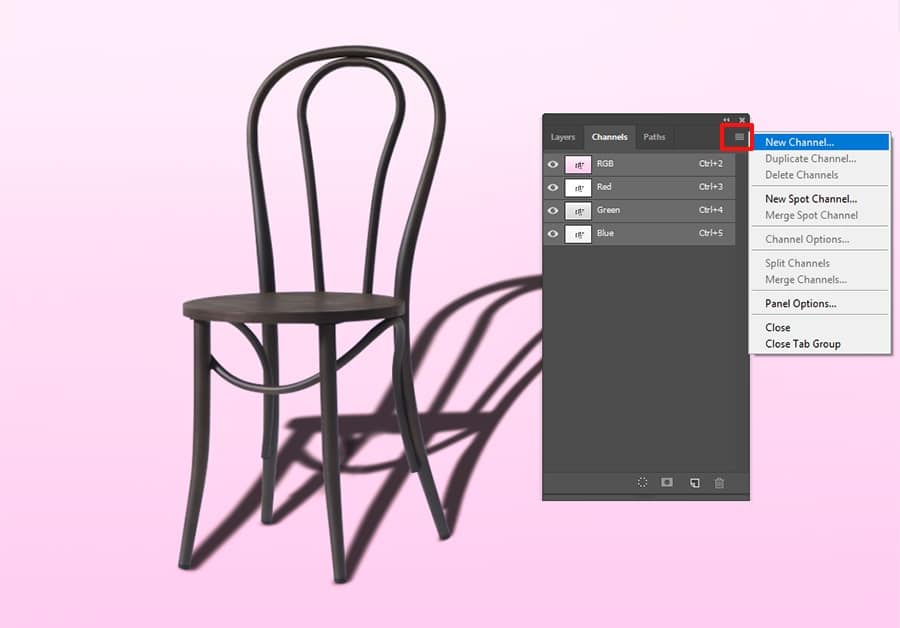
Now open a new channel dialogue box and rename it by 'Alpha -1'. You need to ensure the chosen area radio button is selected under brightness indicates.

Step-8: Add a gradient within your alpha channel
- Select the Alpha-1 channel in your channel palette just because you would choose a layer. Now for the entire modes, you need to ensure that the look is toggled on.
- Now opt for the gradient software from the palette
- Ensure that the background is fixed to white
- And the front ground is fixed to black color
Note: At the top of your application window in the options palette, ensure the slope is fixed to black to white & the slope type is one-dimensional.
- Click on the outer layer of your shadow (when you find the slope setting is fine)
- Now draw the slope or gradient to the particular area of your shadow which is close to the object or thing.
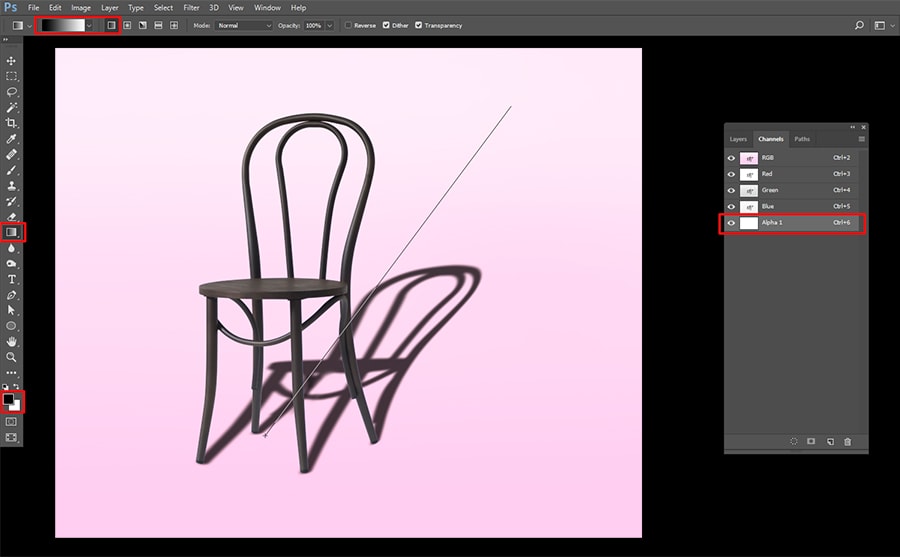
The selection is now ready with a red gradient, which is just overlaying your image now.
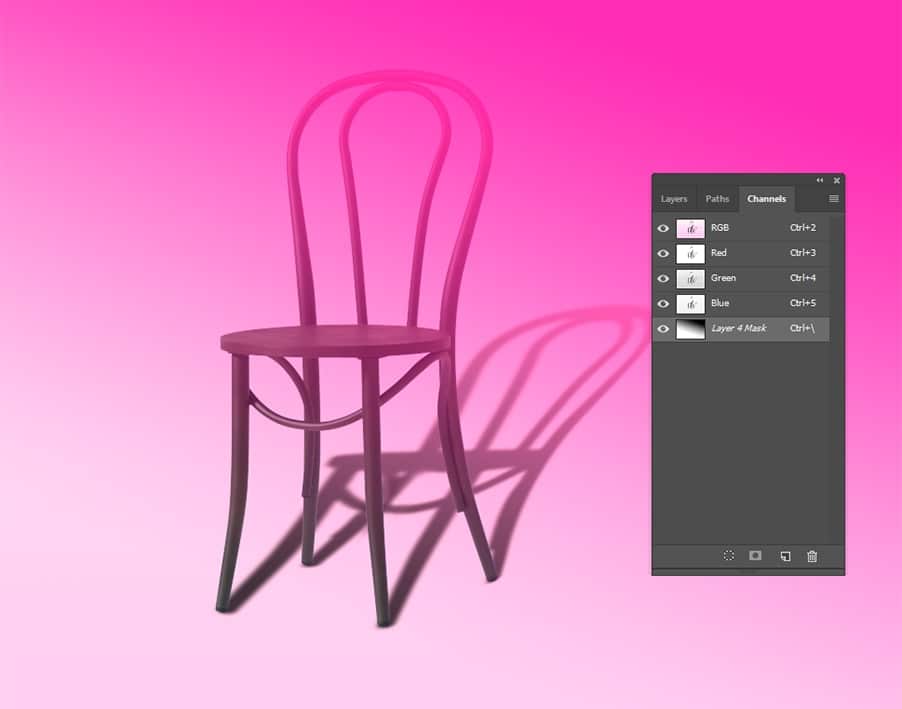
Step-9: Blur selection
When you add your gradient in your alpha channel, you can find a red gradient on top of your photo, showing how the mask within the channel works together with your photo.
You can make the red gradient unseen by toggling the icon next to Alpha 1.
- In your channel palette click on the Top channel (either CMYK or RGB relying on the color style of your photo) to choose your color channels & deselect your alpha channel.
- Go to the layers palette to ensure you have chosen your drop shadow layer
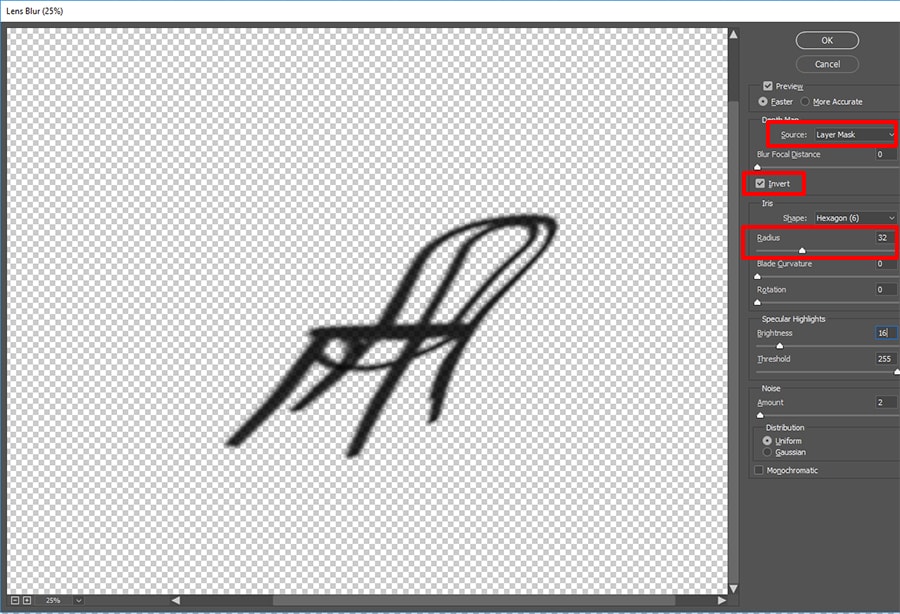
- Go to Filter>Blur> Lens Blur.
Note: You can find a dialogue box where you can get the necessary control over the obscure.
- You should check the box. Choose the Alpha 1 under depth map from the source drop-down menu.
- Make the Blur Focal distance at 0, & next to invert check the box.
- Press ok to leave different values at their defaults.
Step -10: Add a layer mask
- Go to Select>Load selection. A dialogue box will come, and it will give you significant control over your blur setting.
- Select Alpha-1 and ensure the radio option is tested
Note: Go to channel drop-down location to find Alpha-1
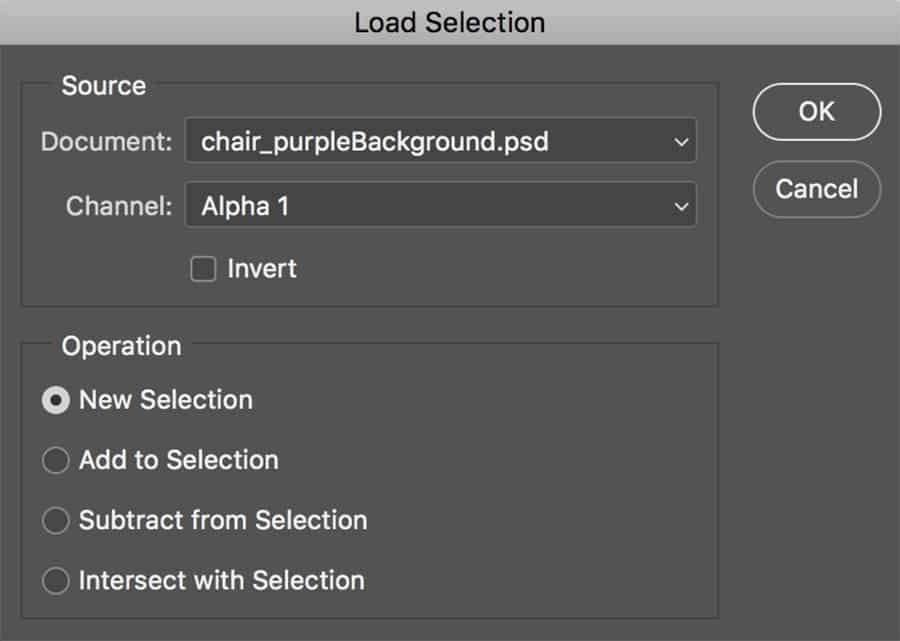
- If done, Press ok.
- Now in the alpha channel, you can find the darkest part of the gradient or slope you made.
- By typing Shift + Control + I or Choose inverse by going to Select> select inverse.
- Click on the Layer Mask option in your layers palette at the end of the palette.
- While the mask is used, the shadow will look "fade" because it retreats into the distance.
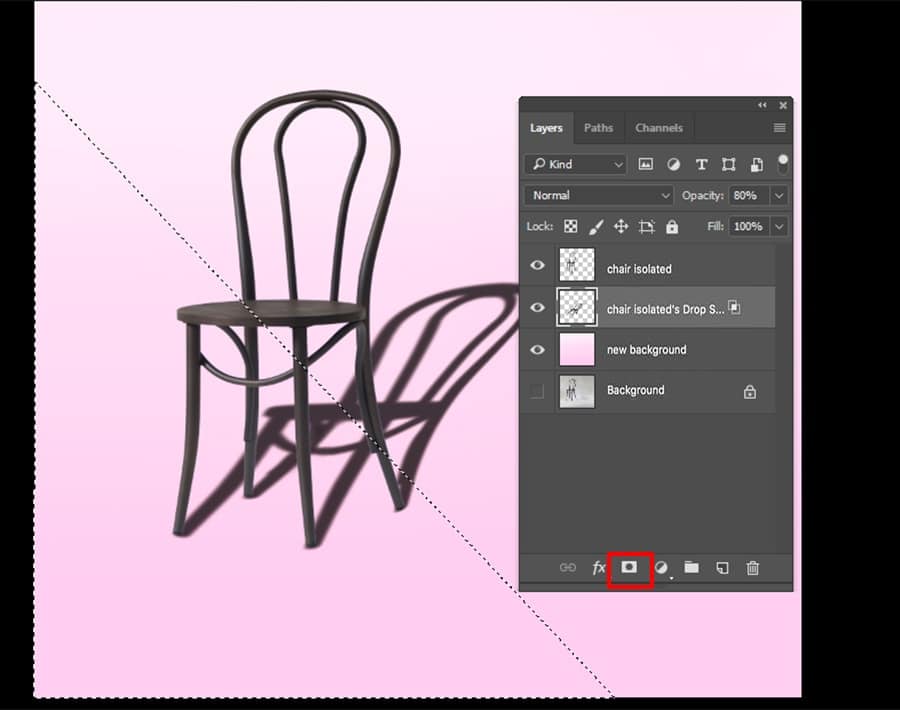
Note: Ensure that the thumbnail around Alpha 1 & thumbnail for the layer (mask) is the same.
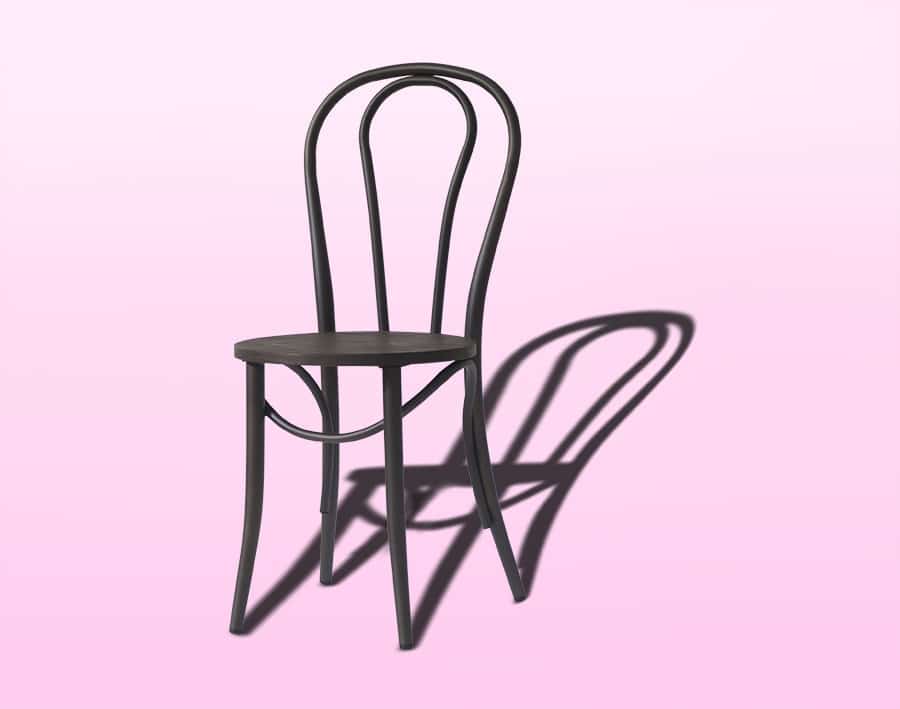
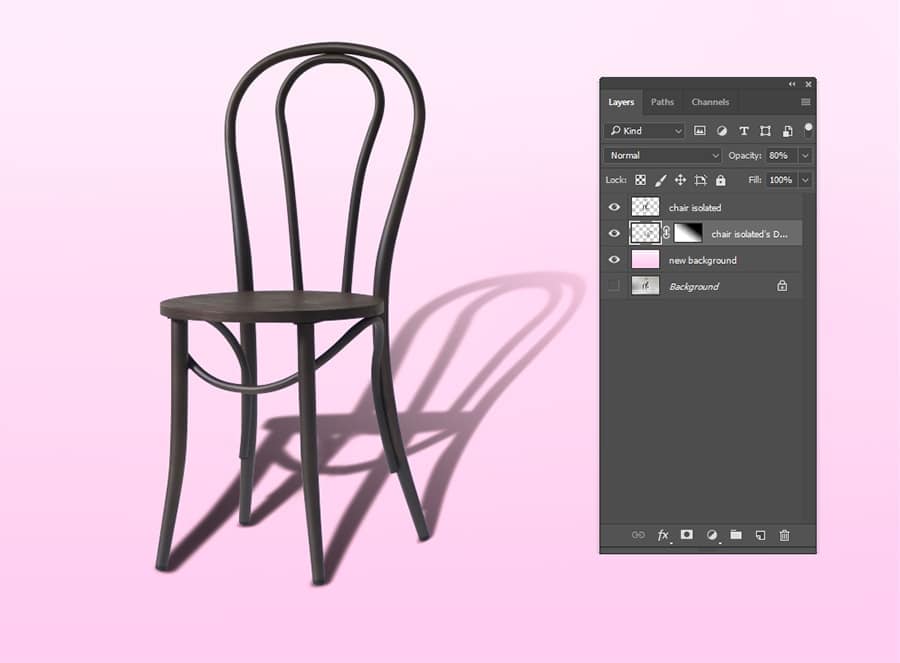
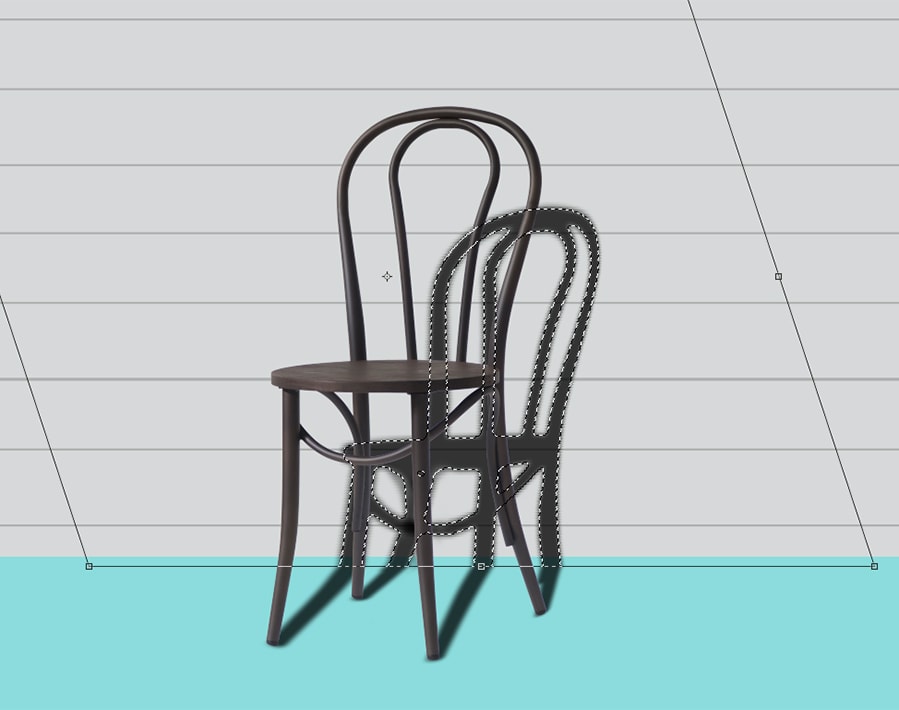
Step-11: Light origin & tidy up shadow
Finally, you need to ensure that the entire shadow is looking good. You should make sure that no shadow looks frontward of the thing because the light origin drives the cast shadow back to the object.
Note: Carefully eliminate the shadows using an eraser that does not belong. Remember that the forelegs of the chair should come to the rear legs of the chair.
The simple way to regenerate these shadows is to make a new layer above your product and the use of your shadow brightness and use the brush to paint in the shadows cast on top of your product.
Fix the layer blend style to increase & adjust the blurriness until it meets the entire shadows.
Use the Variety of Shadows
What will you need when you place your object in another image? Well, you may need to add new cast shadows to meet different shadows in the background.
You may need to add new cast shadows to meet different shadows in the background. Once the cast shadow setting is ok, new shadows in a different direction may add here by repeating the entire step above explained here.

The shadow is customizable and you can easily fix it. Thus you can place it behind the object as well.
Choose the particular section of the shadow with the specific tool (Rectangular Marquee Tool). Now opt for editing, changing, and distorting to place the shadow top of the wall.
- Adjust all colors during the creations of the Alpha channel. Set the foreground color into a dark grey, instead of black.
- At the base of the wall begin the gradient wherein your fade & blur are the same against the back of the wall.

Shadows in e-commerce: When would you use it?
Showing product images in a realistic way is an emotional connection between the shoppers now. Using a drop shadow in your photo you can make it really professional-looking and authentic. In our eCommerce Image Editing Service, one must need to create a shadow.
Now show the product against a white background. Then add a realistic shadow that assists your product open against the background. Thus you can get an attractive and professional-looking image.
So in online business, very often it is mandatory to use a drop shadow or your business product on your website or page.
The drop shadow method adds depth & dimension to your product images while doing photo shooting.
However, in some special cases, you need to do some retouching work to make it look natural. In general, a shadow will add depth to a product image. And, it helps to generate a realistic feeling.
Here is an example from the "Amazon", where you can find drop shadows applied to many photos:

You can find this often in apparel, fashion & accessories.
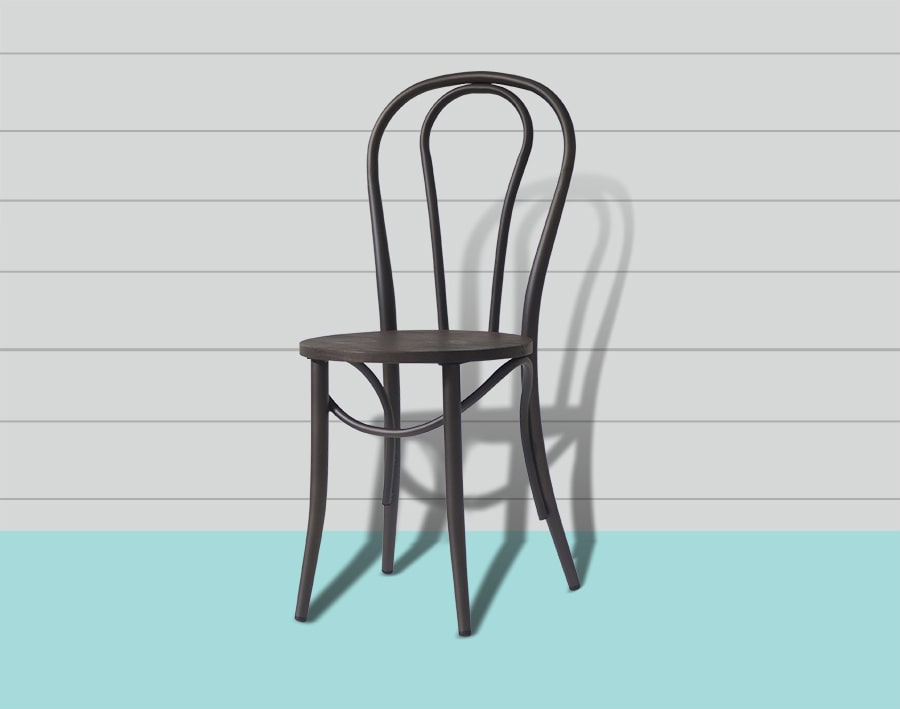
Note: Note: For example, if you visit a furniture or Home decor category in amazon you will find that people add a drop shadow to their product images (such as under/behind the chare). Thus they create additional depth and dimensional illusion to the flat photograph.
Conclusion:
A three-dimensional drop shadow gives us an overall impression of the products surrounding space actually (that is every little shadow where and how just appearing).
We do not want to see any flat image nowadays in any e-commerce store against any product. It does not look natural. Besides if the dimensional look of a product or a person lost, the image becomes unreal. So adding a shadow in photoshop will help you generate sales and attract the viewer's eye.
As we have very upgraded technology, so we feel better modifying a flat product's image into a three-dimensional image with a very realistic shadow appearing with it.
For an e-commerce business, any tiny detail brings us closer to customer satisfaction to a great extent that the customer then feels the real shopping experience.
A 3D image with realistic shadows appearing with it, encourage the customer to set his/her mentality for buying that product just like buying from a shopping mall or vice versa.
So if you are a very competitive owner of an e-commerce business, please don't be late to keep any product image in your e-store just with a realistic, fantastic drop shadow.
Stay well; keep well. Thank you.
Read more:
Shoe Photo Editing Services & Footwear Retouching
Remove White Background Using Photoshop Tools
Change Color of Image in Photoshop CC 2020 –07 Tutorials
How To Create A Drop Shadow In Photoshop Cs6
Source: https://graphicexpertsindia.com/add-drop-shadow-photoshop-tutorial/
Posted by: knottgrecond.blogspot.com
0 Response to "How To Create A Drop Shadow In Photoshop Cs6"
Post a Comment