

How To Draw A Diamond Easy
How to describe a diamond - easy steps to the complex shape
Learn how to describe a diamond. A uncomplicated, step-past-step tutorial to draw a reasonably complex and great looking diamond without getting lost in the maze of polished diamond faces.

Today we will learn how to draw a diamond. We will evidence you an easy manner to describe a reasonably complex and great looking diamond step-by-pace, so yous volition not get lost drawing the many split line edges and polished diamond faces.
pencil
,
eraser
,
colour pencils
drawing newspaper
or
sketch book
Honey drawing? Never miss a tutorial!
How to draw a diamond: base sketch pace by step
Step 1 : Sketch 2 ovals
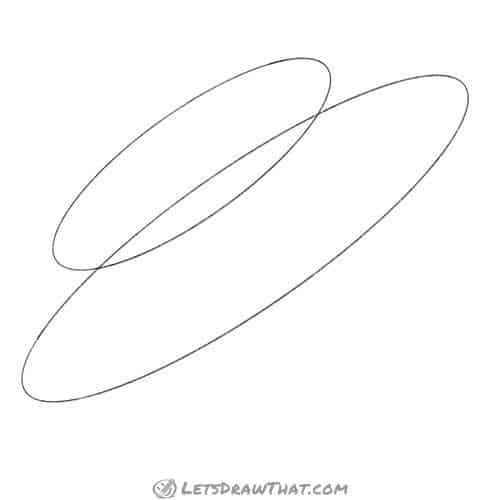
Let's start drawing the diamond with two overlapping ovals. Draw the first, larger oval adequately narrow and long, and slightly tilted. Then add the second oval in same proportions, but smaller, offset to the left so that it overlaps the large oval.
Pace two : Sketch the diamond edges

Next, bring together those 2 ovals with two short direct lines connecting the outer-near edges of the ovals. And so add together two more than lines to form a triangle for the pointed bottom of the diamond. Finally, let's add a simple cross to cut up the acme side of the diamond - this will aid united states split the diamond regularly to draw the polished diamond sides. Notice the long line that starts at the top where the small oval meets the outer edge and goes through the center of the oval to the other side.
Step 3 : Add more division lines
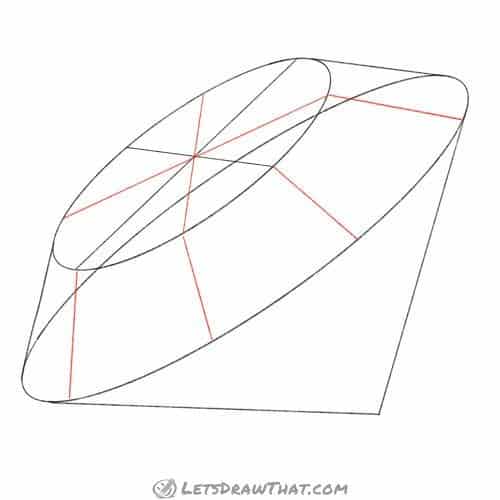
Continue dividing the circular diamond into the segments. Add two more in-between cross-sections to the tiptop oval to divide it into viii same-sized segments. Next, draw 4 curt lines between the summit diamond edge on the small-scale oval and the widest edge on the larger oval. Each line starts where the top segment sectionalization line ends. That is enough for the sketch, let's polish our diamond!
How to draw a diamond: outline the drawing step by step
Step 1: Draw the top edges of the diamond

Since diamonds are fabricated of flat, polished surfaces, information technology is fourth dimension to turn our ovals into some straight sharp edges. Commencement outline the acme small oval, drawing straight lines between all of the eight segments. Then simply outline the short side split lines from the sketch.
Step 2: Split the segments into more pieces

Fourth dimension to add some more of those shiny polished sides to our diamond! Let's split each of the side segments into three pieces. Describe a "V" into each of the three fully visible segments, starting at the top corners with the pointy bottom in the centre of the segment on the large oval. Then add two more splits, one at the top and i at the bottom - those would be the same "5" shape, but since we can run across only half of them as the diamond curves, they become elementary lines.
Stride iii: Draw the outer edges of the diamond

Time to depict the outer edges of the diamond. Describe along the large oval, joining all the segments with a straight line, rather than following along the oval bend. Finally, join the 2 sides with the top octagon (that is a fancy discussion for the shape with eight sides).
Step 4: Draw the pointed diamond bottom

With the top of the diamond polished into many shiny sides, information technology is time to focus on the pointy bottom end of the diamond. Describe 4 directly lines from the pointy acme. The two outer lines are merely a directly outline of our sketch. The ii inner lines showtime again at the acme and end one segment in on the wide border.
Step 5: Add few final edges
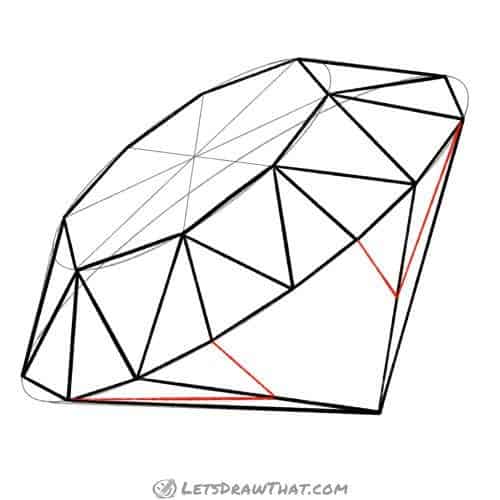
Just to make our diamond await even fancier, let's add four more final edges. These start half-style upward the inner lines nosotros drew in the previous stride and terminate i segment out on each side on the wide border of the diamond.
How to draw a diamond: finished drawing
How to draw a diamond: finished outline drawing

And here is our diamond in its total glory, after we have erased the sketch lines. This was a fairly piece of cake style to describe a fairly complex and slap-up looking diamond. Hopefully, you did not get lost in all those divisions and separate lines and enjoyed learning how to draw a diamond.
How to draw a diamond: finished drawing coloured-in
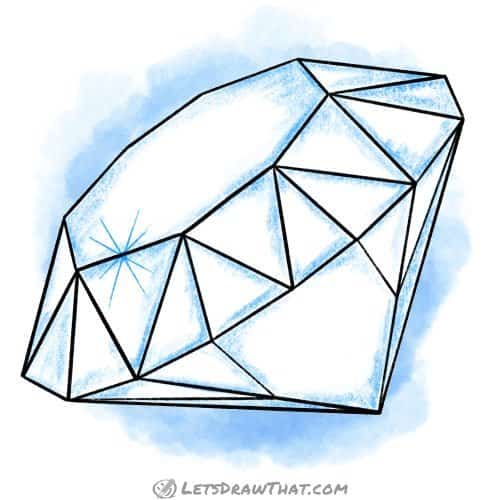
Our usual final footstep is to colour in the drawing. Since diamonds are clear, here nosotros employ just some calorie-free bluish unproblematic shading along the edge lines. If yous are after a more than colourful cartoon, check out this stunning picture of the Dynasty diamond reflecting many unlike colours.
Like this tutorial? Share it with others:
Dearest cartoon? Never miss a tutorial!
Become notified when at that place is a new tutorial published on Let'southward Draw That! (ii-iv times a month)
Check out the latest tutorials:
Like this? Share the fun with others:


Source: https://letsdrawthat.com/how-to-draw-a-diamond/
Posted by: knottgrecond.blogspot.com
0 Response to "How To Draw A Diamond Easy"
Post a Comment