

How To Create Local Docker Registry
Introduction
If you want to ensure smooth CI/CD development using the Docker platform, consider setting up a private Docker registry. Not only does it speed up delivery, but it is also a practical way of distributing resources and sharing Docker images among containers.
In this tutorial, learn how to set up a private Docker registry and configure it for external accessibility.

Prerequisites
- Access to a user account withsudo orroot privileges
- A client server
- A server for private Docker Registry
- Docker and Docker–Compose on both servers
- Nginx on the private Docker Registry server
What is a Private Docker Registry
Docker Registry is a server-side application and part of Docker's platform-as-a-service product. It allows you to locally store all your Docker images into one centralized location.
When you set up a private registry, you assign a server to communicate with Docker Hub over the internet. The role of the server is to pull and push images, store them locally, and share them among other Docker hosts.
By running an externally-accessible registry, you can save valuable resources and speed up processes. The software lets you pull images without having to connect to the Docker Hub, saving up bandwidth and securing the system from potential online threats.
Docker hosts can access the local repository over a secure connection and copy images from the local registry to build their own containers.
Before You Start
As listed in the prerequisites section, the guide assumes you already have Docker and Docker-Compose installed on all servers.
To verify that you have the required software, you can check their release versions with the commands:
docker version 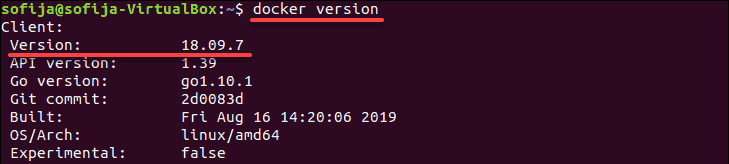
docker-compose version 
Another thing you will want to ensure is that the Docker service has started and is set up to enable at boot time:
sudo systemctl start docker sudo systemctl enable docker 
Install and Configure Private Docker Registry
Step 1: Create Registry Directories
Start configuring the server that is going to host the private registry. You first want to create a new directory that will store all the required configuration files.
1. The following command creates a new project directory labeled registry and two sub-directories - nginx and auth :
mkdir -p registry/{nginx, auth} 2. Move into registry and create two new directories inside nginx :
cd registry/ mkdir -p nginx/{conf.d/,ssl} 3. See the hierarchy of the newly-created directories by typing:
tree 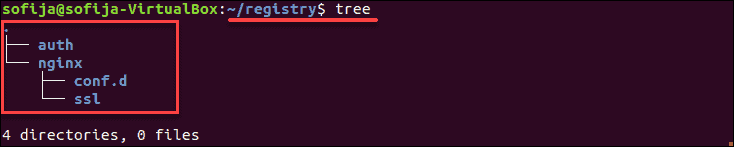
Step 2: Create Docker-Compose Script and Define Services
Next, you need to create and configure a new docker-compose.yml script. The script defines the Docker-Compose version, as well as the services you need to set up a private registry.
1. Create a new file, while in the registry directory, with a text editor of your preference:
nano docker-compose.yml 2. There are a few things you need to define in this configuration file, so follow along closely and carefully add each section of the content:
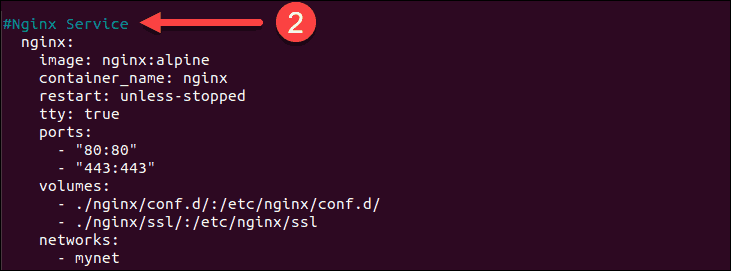
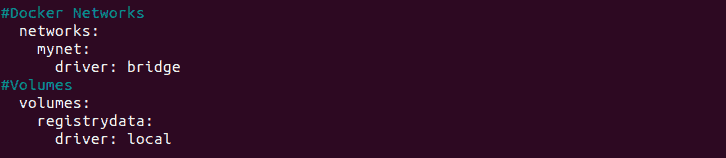
version: '3' services: #Registry registry: image: registry:2 restart: always ports: - "5000:5000" environment: REGISTRY_AUTH: htpasswd REGISTRY_AUTH_HTPASSWD_REALM: Registry-Realm REGISTRY_AUTH_HTPASSWD_PATH: /auth/registry.passwd REGISTRY_STORAGE_FILESYSTEM_ROOTDIRECTORY: /data volumes: - registrydata:/data - ./auth:/auth networks: - mynet #Nginx Service nginx: image: nginx:alpine container_name: nginx restart: unless-stopped tty: true ports: - "80:80" - "443:443" volumes: - ./nginx/conf.d/:/etc/nginx/conf.d/ - ./nginx/ssl/:/etc/nginx/ssl/ networks: - mynet #Docker Networks networks: mynet: driver: bridge #Volumes volumes: registrydata: driver: local 3. Save and close the file.
The configuration explained:
Firstly, you define the version of Docker-Compose you want to use. In this example, it is version: '3' . Then you move on to defining all the components of the Docker registry, starting with the #Registry service.
Docker Registry is essentially a container running the registry image, which is why the image is defined as registry:2 .
Adding the restart: always line ensures you start Docker Registry as a service as soon as you boot up the system.
Determining the ports 5000:5000 instructs Docker that the host and the running container communicate over the defined port numbers.
The service will mount the docker volume registrydata and the local directory auth , along with its authentication file registry.passwd .

The next element is the #Nginx Service . The configuration outlines the service runs on ports 80:80 (HTTPS) and 443:443 (HTTPS). It will mount the local directory for virtual configuration ( conf.d ) and SSL certificates ( ssl ).
Finally, set mynet with a bridge driver and the registrydata with a local driver as parameters for the custom network.
Step 3: Set Up Nginx Port Forwarding
The next step is configuring a Nginx virtual host and configuring it for the Nginx service.
1. Move to the nginx/conf.d/ directory you created in the previous step:
cd nginx/conf.d/ 2. Create a new virtual host file named registry.conf :
nano registry.conf 3. Add the following content:
upstream docker-registry { server registry:5000; } server { listen 80; server_name registry.example-server.com; return 301 https://registry.example-server.com$request_uri; } server { listen 443 ssl http2; server_name registry.example-server.com; ssl_certificate /etc/nginx/ssl/fullchain.pem; ssl_certificate_key /etc/nginx/ssl/privkey.pem; # Log files for Debug error_log /var/log/nginx/error.log; access_log /var/log/nginx/access.log; location / { # Do not allow connections from docker 1.5 and earlier # docker pre-1.6.0 did not properly set the user agent on ping, catch "Go *" user agents if ($http_user_agent ~ "^(docker\/1\.(3|4|5(?!\.[0-9]-dev))|Go ).*$" ) { return 404; } proxy_pass http://docker-registry; proxy_set_header Host $http_host; proxy_set_header X-Real-IP $remote_addr; proxy_set_header X-Forwarded-For $proxy_add_x_forwarded_for; proxy_set_header X-Forwarded-Proto $scheme; proxy_read_timeout 900; } } 4. Save the file and return to the terminal shell.
Step 4: Increase Nginx File Upload Size
By default, Nginx limits the file upload size to 1MB. As many Docker images exceed this number, the best practice is to increase the maximum file size on Nginx. Ensure you can upload images that are of larger file size by setting the max_body_size to 2GB.
1. Create an additional configuration file with:
nano additional.conf 2. Add the following line in the file:
client_max_body_size 2G; 3. Save and close the file.
Step 5: Configure SSL Certificate and Basic Authentication
1. The SSL certificates files of your domain need to be copied to the ssl directory. To do that, run the commands:
cp /path/to/ssl/fullchain.pem ssl/ cp /path/to/ssl/privkey.pem ssl/ 2. Then, move to the auth directory:
cd auth 3. And request a new password file named registry.passwd for your user:
htpasswd -Bc registry.passwd example 4. Type in a strong password and re-type it to confirm. With this, you have added a password for your user.
Step 6: Add the Root CA Certificate
Now you need to add the Root CA certificate to Docker and the system you are working on.
1. Export the .crt file with OpenSSL by typing:
openssl x509 -in rootCA.pem -inform PEM -out rootCA.crt 2. Copy the Root certificate into a new directory for Docker certificates:
mkdir -p /etc/docker/certs.d/registry.example-server.com/ cp rootCA.crt /etc/docker/certs.d/example-server.com/ 3. Next, copy the same certificate into another new directory under the name /usr/share/ca-certificate/extra :
mkdir -p .usr.share.ca-certificates/extra/ cp rootCA.crt /usr/share/ca-certificates/extra/ 4. Reconfigure the newly created ca-certificate package by typing:
dpkg-reconfigure ca-certificates 5. Finally, restart the Docker service:
systemctl restart docker Step 7: Run Docker Registry
With everything set up and ready, you can build the Docker Registry container using Docker-Compose:
docker-compose up -d Check if the Registry and the Nginx services are running:
docker-compose ps netstat -plntu The output should show you the services and their assigned ports.
Pull Image from Docker Hub to a Private Registry
1. To locally store an image from Docker Hub to your private registry, use the docker pull command:
docker pull [docker_image] 2. Add a tag to the image to label it for the private registry:
docker image tag [docker_image] registry.example-server.com/[new_image_name] 3. You can check whether the Docker image is locally available by prompting the system to list all locally stored images:
docker images How to Push Docker Image to Private Registry
1. To push an image from a Docker host to the private Docker registry server, you first need to log in to the registry with the command:
docker login https://registry.example-server.com/v2/ 2. Type in the username and password you defined for the virtual host.
3. Now you can push your image to the private registry with the command:
docker push registry.example-server.com/[new_image_name] 4. See a list of images stored in the private Docker registry:
http -a example https://registry.example-server.com/v2/_catalog Conclusion
You have now successfully set up a private Docker registry on Ubuntu 18.04, along with a Nginx virtual host and basic authentication. Use it for managing Docker images and building containers on remote Docker hosts.
Was this article helpful?
Yes No
How To Create Local Docker Registry
Source: https://phoenixnap.com/kb/set-up-a-private-docker-registry
Posted by: knottgrecond.blogspot.com
0 Response to "How To Create Local Docker Registry"
Post a Comment