

How To Create Film Look In Photoshop
Read Time: 14 mins Languages:
Processing photographs is an extremely fun and important part of photography. It can help polish a flat looking RAW file into something to be proud of. Making photos look unique can sometimes be very challenging, and it's no surprise that giving images the film look is really popular.
It looks impressive, and can give a sense of drama and authenticity. Most importantly, everyone has a different idea of how film looks, so it's a great opportunity to create your own style, and give each photo a unique color, tone, grain structure and feel.
In this tutorial, I'll show you how to process your digital photos, and turn them into cellulose acetate marvels. We'll analyse the different ways you can use these effects in your photography, how you can emulate your favourite films, and the process involved in getting that film look.
The Film Look
There are a variety of film looks that you can achieve through post-production. You can emulate your favourite film, or create a whole new look that defines you as a photographer. It's this variation that makes the editing process really enjoyable. Almost like shooting film, you don't exactly know what the end result will look like until you see it.
There are countless situations where the look of film can have an effect on the emotions being portrayed, and the mood. Wedding photography is an extremely popular genre that can benefit from this, and it can be a way to give your clients special, memorable moments that appear timeless.
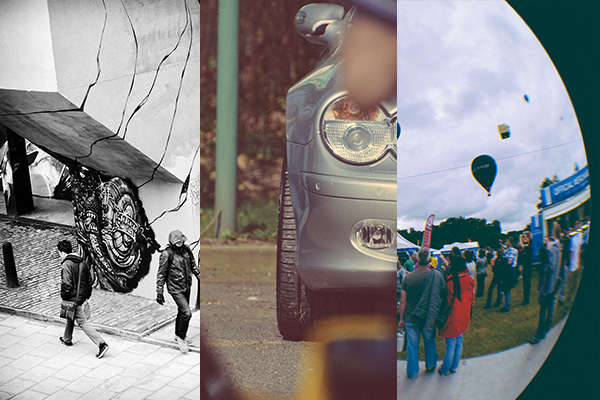
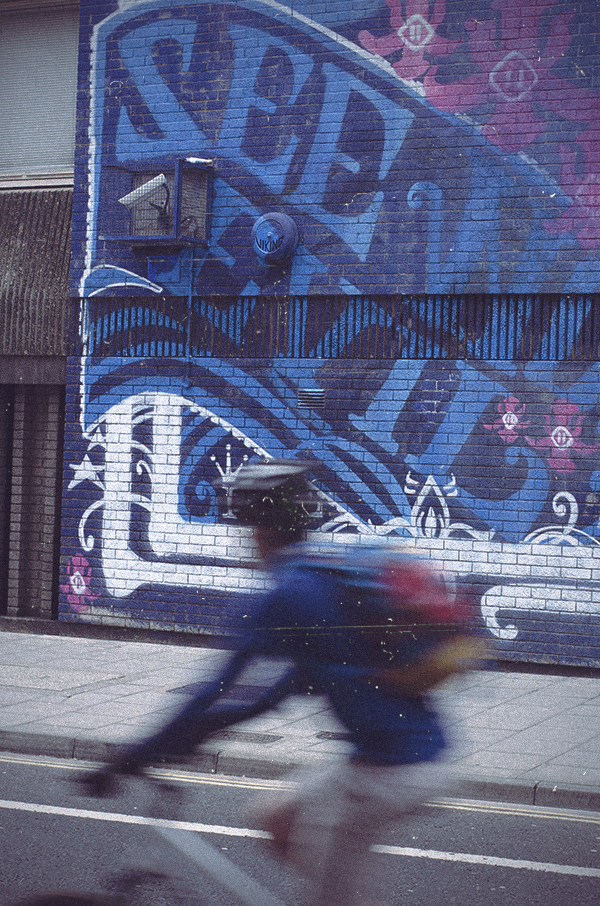
Street photography is another example of a great genre of photography that film processing works well with. It has a raw and realistic feel when done in a certain way, giving photos a documentary look that really compliments the genre.
It especially works when street photos are converted to black and white, focusing the viewers' attention on what's happening in the scene and taking away any distractions that can arise in built up areas.
Color or black and white, it's your choice to decide which direction you take and what look you want to achieve, so let's get started.
A Few Notes
While editing your photo, it is important to do so non-destructively, meaning you don't permanently alter your original photo. To do this, I'm going to use adjustment layers and smart objects throughout this tutorial, so be sure to follow along.
It is also important that you use a photo that has been shot in a raw format, as this gives you the greatest scope for editing. Colors will be less likely to clip, and highlights and shadows are easier to control without bringing in any unwanted and artificial looking noise and banding.
1. Picking the Right Photo
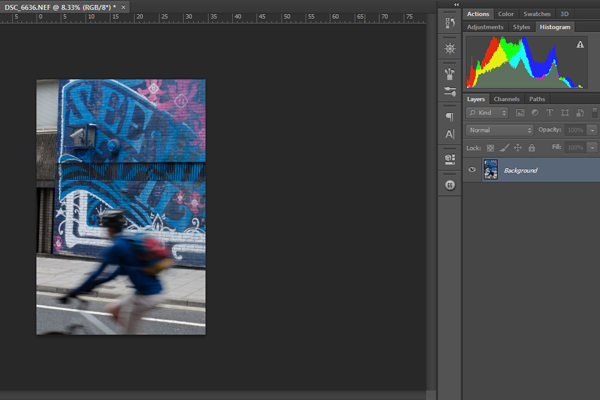
As I explained before, there are many genres that work well with the film look, so experiment with a lot of different photographs when following this tutorial. I've chosen this photo of an urban landscape. I think this is a perfect candidate for some film toning due to the vibrant color and simplistic composition. I want to use the film look to give the photo a timeless feel.
Make sure when picking your image that it has a reasonable spread of shadows, midtones and highlights, as it is much easier to work with later on in the tutorial when editing tones.
Now, import your photo into new document in Photoshop.
2. Find the Look You Want
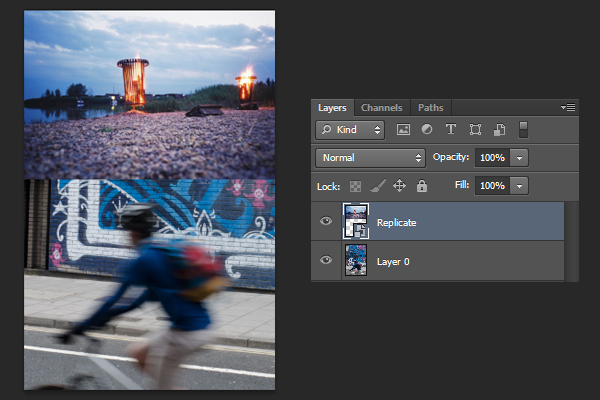
We're going to be using a technique to try and mimic the tone and colors of an existing photo to get a look that's close to an actual roll of film. First, find a photo off the internet or from your own photo collection that has been shot on film, and has a look you want to try and replicate.
I'm going to try and replicate the look of Lomography 35mm color film. The blue tones are quite strong and there is a noticeable magenta tinge in the highlights. There is also a noticeable lack of strong green tones throughout.
Next, import the photo you want to replicate into your Photoshop document, and place it above your own photo as shown in the screenshot. Name this layer 'Replicate'.
3. Masking
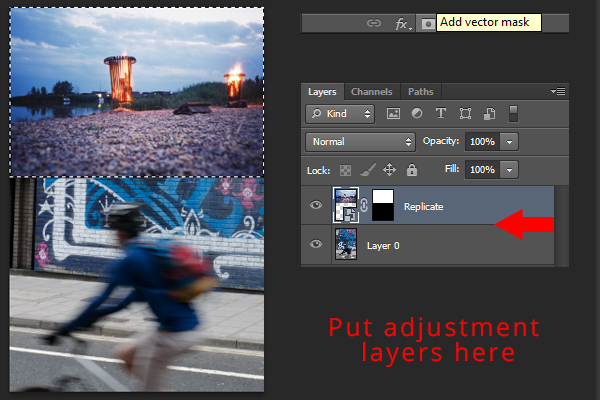
Next, to make sure you aren't affecting the photo we want to emulate, mask it out.
To do this, use theRectangular Maquee Tool and drag a selection around the photo you want to emulate. Then press theLayer Mask button at the bottom of theLayers panel.
Make sure when you start usingAdjustment Layers later in the tutorial, that you place them in between your photo and the photo you want to replicate as demonstrated in the screenshot.
4. Exposure Adjustments
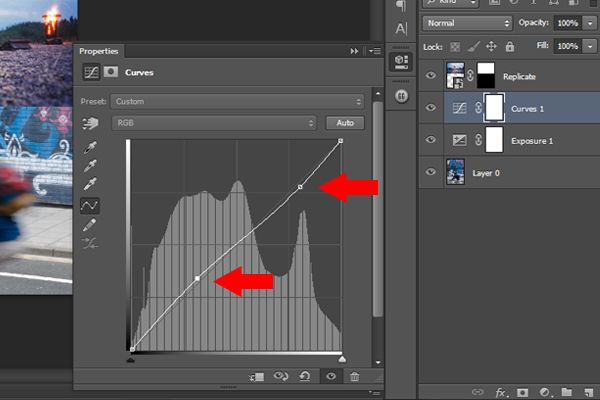
Film has an inherently wide dynamic range, so it is important to correct your exposure slightly first by bringing down the highlights, and boosting the shadows. This makes the photo appear flat, but you will be correcting this later. First, create a newCurves Adjustment Layer by going toLayer > New Adjustment Layer > Curves.
Then, make a reverse 'S' shape, as shown in the screenshot below in the dialogue by clicking and dragging on the line. Different parts of the graph represent different parts of your image. The left side represents the shadows of your image, the middle represents the midtones, whilst the right represents the highlights. Notice how my image is mostly made up of shadows and midtones.
I'm also boosting the exposure of my image slightly with anotherAdjustment Layer, as it is slightly underexposed. Make sure you get a reasonable spread of tones across the range.
5. Judging the Tone
The next step is to adjust the tone of your photo, and try and match it roughly to the film image you want to replicate. I'm going to use Ben Secret's method of tone and color matching.
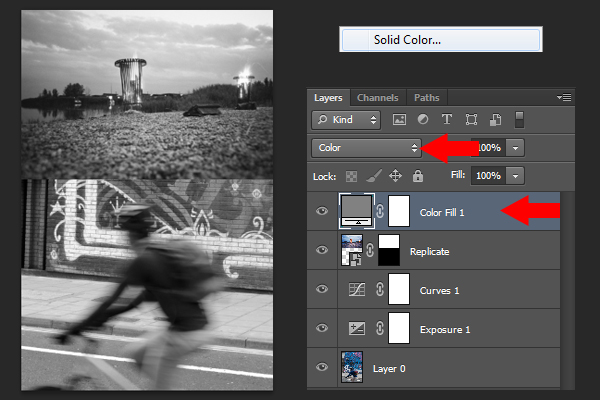
First, create a50% Grey Solid Colour Layer. To do this, go into theAdjustment Layer menu, and selectSolid Color. Choose a50% Grey, which is 128, 128, 128 in RGB values or the Hex value 808080. Press OK, and drag this layer above everything else in your Layer structure. Next, change theBlending Mode of the solid color layer toColor.
6. Editing the Tone
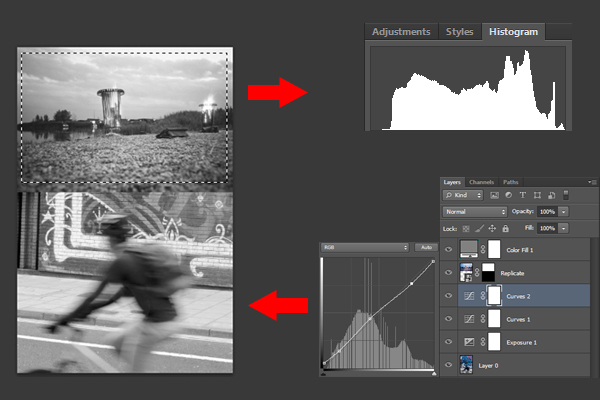
Make sure you have the histogram tool open for this next part by goingWindow > Histogram. Using theRectangular Marquee tool, make a selection around the photo you want to replicate and look at the histogram.
Have a look at how the highlights and shadows are structured, and create a newCurves Adjustment Layerjust above your other one in the layer structure. UseCurves to alter your own photo to try and get a similar Tone structure by clicking and dragging the graph line to alter the shadows, midtones and highlights. Use theRectangular Marquee Tool over both photos to judge how close you are getting.
Notice how in my example, the image I want to replicate is quite flat in contrast, and the shadows and highlights aren't very strong. In my image, I've achieved this by boosting the shadows, and pulling down the highlights.
7. Judging the Color
Now the photos are similar in tone, you can concentrate on the achieving a similar color.
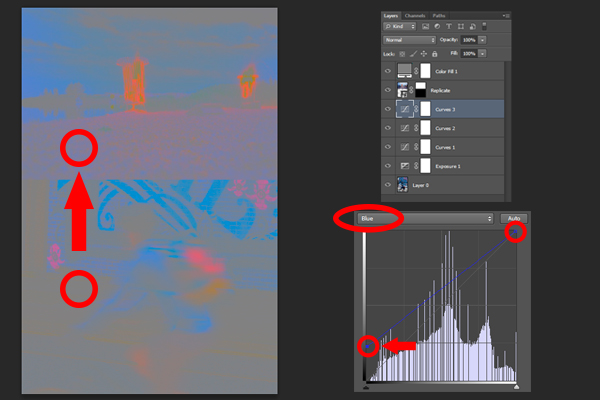
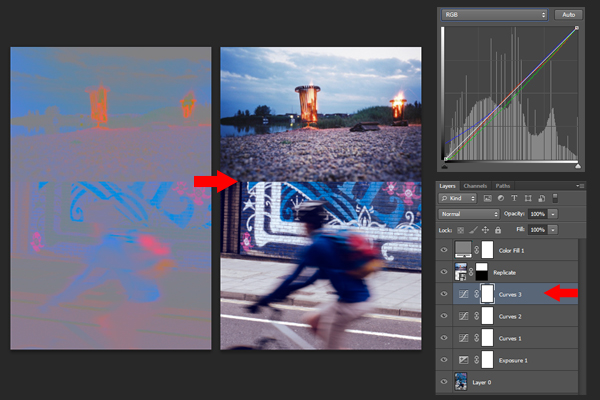
First, change theBlending Mode of theColor Fill layer you made earlier toLuminosity. This shows you an accurate representation of the colors of the photos. Here, you can judge what colors to add, and what to take away in comparison. To do this, anotherCurves Adjustment Layer will be used to edit the individualRed, Green and Blue channels independently.
Notice how in my photo, the shadows are a brown/green color, and in the photo I'm trying to replicate, there are a lot of blue and magenta tones. I've circled them in the screenshot to show you what I mean.
In other areas of the photo I want to replicate, the midtones have a slight purple cast to them, and the Highlights have a green/brown color.
8. Editing the Color
To begin, create a new Curves Adjustment Layer. Start by adjusting the shadows of your image to match the one you want to replicate, and go through each channel: Red, Green, and Blue.
To edit these colors, drag the end points of each color channel and adjust them by sliding them either vertically or horizontally.
In my example, more blue needs to be added to the shadows, so I've pushed up the shadow base point in the blue channel, until theOutput value is around 30. Then I've used more points to alter the Curve, and gradually pulled it back towards normal values towards the highlights region. I've then switched to the green channel and decreased the amount of green in the shadows, and then switched to the red channel and decreased the amount of red in the shadows.
Next, do the same for midtones and highlights, adjusting different parts of the curve in each color channel. It is an experimental process at first, but you will gain an understanding of curves and how colors mix between channels.
Notice how there is much more of a similarity between the color of the 2 photos now. You can see this clearly in the color map. Now, delete theFill Color layer as you don't need it anymore.
9. Vibrance and Saturation
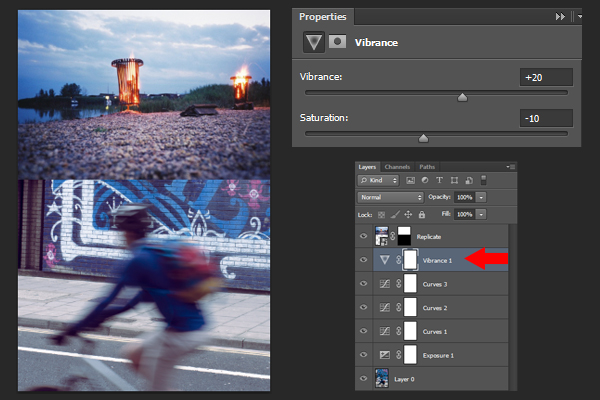
Next, add a newVibrance Adjustment layer. TheVibrance slider is used to adjust only the weaker colors in the photograph without affecting other colors that are already quite punchy and saturated. However, theSaturation slider affects the image as a whole, and all colors will be adjusted. Tweak these values to suit the look you're trying to create.
In my example, the overall image is too saturated, but some of the weaker colors need to be stronger. I'm decreasing the value of theSaturation slider by around 10, whilst boosting theVibrance slider by around 20. This gives the colors of my image a much more even look, and matches the film I'm trying to replicate a lot better.
10. Texture and Contrast
The next parts of the tutorial are for finishing process. You can start to get a little more creative and have some fun. To start off the finishing process and make the image look more authentic, the use of texture is a great way to add age. The method I'm going to show you also gives the photo a really flat contrast in the shadows.
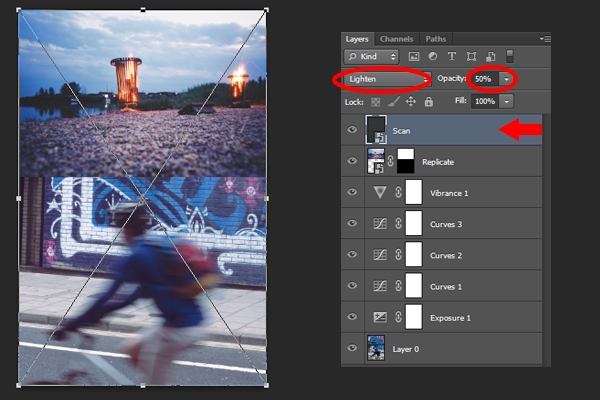
First, scan a piece of black or dark grey card at a reasonably high resolution (300dpi or above). The more scratched and dusty it is, the better, as this will only add to the look of your final photo. I've provided my own scan as a file in the assets to use in your own photos.
Next, import the scan into your Photoshop document, and place it above all your adjustment layers. Set theBlending Mode toLighten, and adjust theOpacity of this layer to suit to control the strength of the effect. I've adjusted theOpacity to 50% as it was too strong at 100%.
11. Film Dust and Additional Scratching
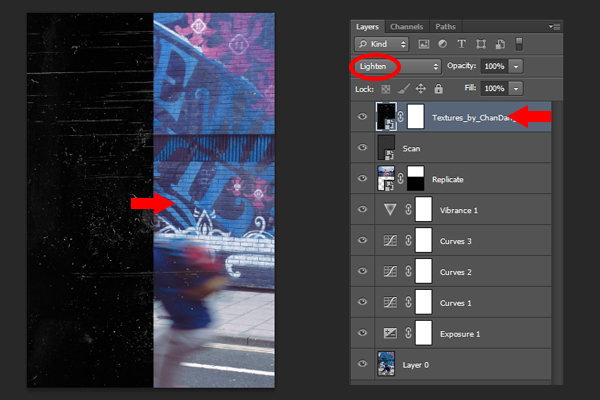
To add another layer of authenticity on top of the texture, I've added a dust and scratch texture created by DeviantArt user ChangDang.
Remember to give credit to the author when using it online, and always get written permission if you want to use it commercially.
Add the texture to your Photoshop document and resize it to cover the whole image by pressingCtrl-T. Try and scale it proportionally to keep the shapes of the dust and scratches the same by holding theShiftwhile resizing. Now, set theBlending Mode toLighten, and see the dust and grain appear. The textured effect looks fantastic in my opinion!
If the effect is too much for your taste, you can use aLayer Mask to paint out areas of the texture you don't like. You can also use theOpacity slider to adjust how strong the effect is overall.
12. Grain
Film has a natural grain that is very hard to replicate authentically. TheNoise filter is good enough for this however, and I'm going to use it to add a natural-looking grain.
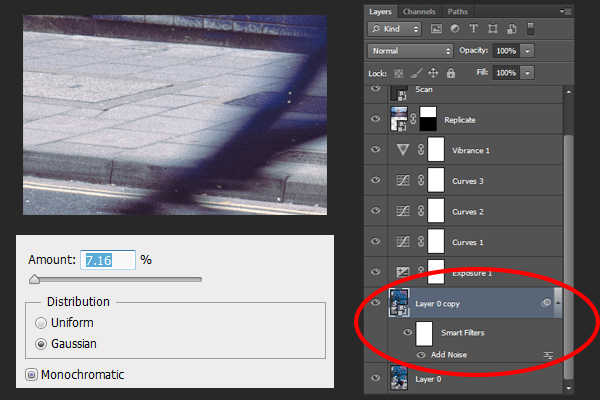
First, duplicate your original photo layer by pressingCtrl-J. This is being created purely as a fail-safe. Then with the new layer selected, go toFilter > Convert forSmart Filters. This makes all filters applied to this layer editable at any time and does not permanently affect your original image.
Next, go toFilter > Noise > Add Noise. For the amount, choose around 7% for a fine grain, or more if you want a very gritty look. Make sure in theDistribution section theGaussian button is checked, and at the bottom of the dialogue box, theMonochromatic box is also checked. This makes it look more like a fine film grain, rather than patchy sensor noise.
13. Vignetting
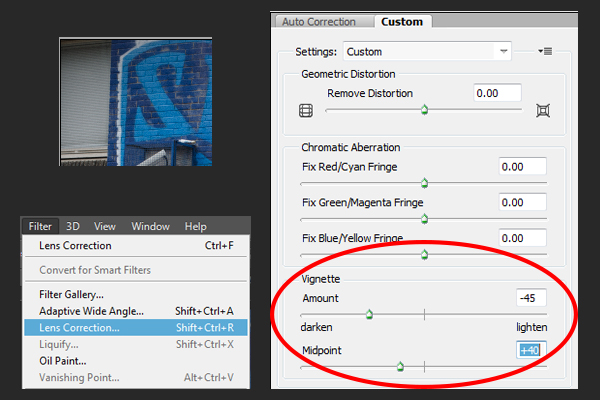
Finally, for a finishing touch, a vignette is also an excellent way to not only complete the look, but focus the viewers' attention on the subject. With the duplicate photo layer selected (the one you just applied noise to) go toFilter > Lens Correction.
Click on theCustom tab, and look for the section titledVignette. This is normally used to correct any vignetting issues when processing raw files, but we want to artificially add it. Drag theAmount slider down to a negative value. Around –45 to -50 is a strong enough effect.
Under theMidpoint section, use the slider to control how the vignette falls off towards the edges, and press OK when you're finished.
Finally, hide the layer called you calledReplicate, and save your image!
Alternative Methods, Software and Plug-ins
An alternative way to process your photos to look like film is to use standalone software, plugins and presets.
Though not as unique as creating your own effects and experimenting, using them can be a great time saver for when you want a fast way of producing decent results. They offer great flexibility in allowing you to tweak the effect completely too.
Actions or Presets
There are a great number of actions or presets available from Graphic River, which can give you the film look, with a couple of clicks.
1. Cinematic Photo Effects for Photoshop


With 10 effects to choose from, these actions can give you everything from the street look we discussed earlier, to something reminiscent of the Film Noir era.
2. 37 Cinema Hollywood Movie FX Bundle for Photoshop


Use alone or in conjunction with others in the pack for a wealth of editing options. All non-destructive and able to be customised to suit.
3. Faded Films - 72 Film & Retro Effect for Photoshop


These actions give you so much choice and all run very quickly, so you can test, mix and match until your heart's content.
4. HQ Film Emulation Actions for Photoshop


Choose from 8 actions and 2 high-quality textures to give your images a vintage, film look. All layers can be edited and are non-destructive.
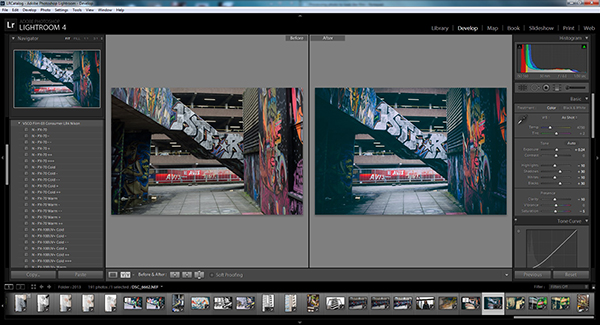
5. Cinematic Lightroom Presets


Cinematic Lightroom Effects contains 10 Lightroom photo presets designed to give your images drama. Includes:War Movie, fashion shoot, street reality, Historic/Action Drama 1+2, Fantasy/Dreamy, Thriller, Sepia-like, 60's Western and Film noir.
The Nik Collection
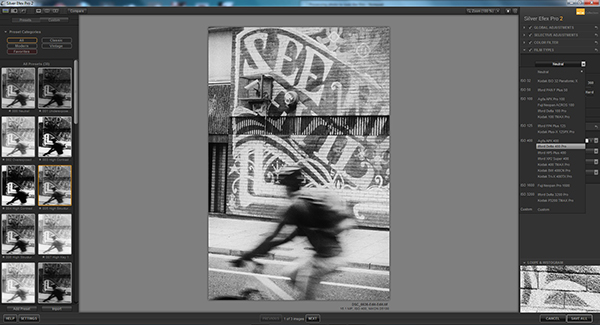
Another alternative is the Nik Software plug-in suite, free from Google for Photoshop, Lightroom and Aperture, the Nik Software suite offers a variety of editing options.
Color Efex Pro 4 and Silver Efex Pro 2 are the stand out plug-ins from the pack, and offer extensive editing capabilities to help you achieve the film look. Silver Efex, in particular, has a selection of black and white film presets mimicking various manufacturers such as Ilford, Kodak, and Fuji. These are all editable and offer fine control over the grain structure, softness, and overall tints and tones.
Conclusion
I hope this tutorial has helped you understand how you can create an authentic film look to use on your photos. You should also now know what situations you can use them in and a few different ways to get the look you desire.
Be sure to experiment with these effects and make your own versions of your favourite films, or create an entirely new look.
I'd love to see some of your own film inspired photographs, so be sure to put a link in the comments below and if you have any suggestions to share, please comment
Final Image

My name is Chris and I am a student in the UK. I am a currently at university studying for a degree in Interactive Digital Media and have a passion for photography.
How To Create Film Look In Photoshop
Source: https://photography.tutsplus.com/tutorials/how-to-make-your-digital-photo-look-like-film--photo-14067
Posted by: knottgrecond.blogspot.com
0 Response to "How To Create Film Look In Photoshop"
Post a Comment